
Undoubtedly not a single thing more exasperating than a battery concern. You forget the lights on or there is a internal concern and your TATA model Xenon battery is lifeless! Not very practical when you have things to conduct.
Lucky you , the battery replacement procedure is manageable and the sole specific pain is choosing the ideal battery for your TATA model Xenon.
The battery substitution is very simple and it involves only three basic steps!
If you want to obtain the ideal battery for your TATA model Xenon here some suggestions that you will find on Amazon, a world famous website


Soon after selecting your future battery, keep an eye on these following techniques and you will be fine back again with your car
Just before changing your battery, shall we remind you to park the vehicle in a consistent place, emergency break on and be clear the fact that the engine is off!
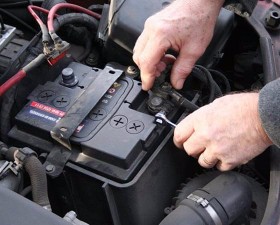
1 – Disconnect the battery wires
The battery is installed beneath the hood of your vehicle. Stretch the hood release lever located on the driver side. Once you have access to the battery, you should detect that there is two wires in there. Be vigilant, there is one positive cable and one negative cable. You have to keep in mind where these were positioned in or you might be in stress while putting back the new battery on your car.
2 – Take out the older battery of your TATA model Xenon
Extracting the old deceased battery from your car should certainly not be a problem. Immediately after all cables are removed, just grab the unwanted battery and there you go. Be careful due to the fact that batteries can be incredibly heavy. If you aren’t sure about your power, support would probably be sweet.
In cases where you see some particles or any additional impurities, use a cloth and purify the battery’s rack to avoid any problems for the upcoming step
3 – Mount the new battery on your TATA model Xenon
Assuming you completed things good, you will definitely keep in mind the previous battery placement. Put the all new battery in the actual same placement and connect the positive cable on the appropriate space and same way for the negative cable.
Now your car should be working like the first day!
Just after your battery is changed, don’t put the previous battery in the trash can or in the outdoors! This car part is heavily dangerous and it will be damageable for the environnement. Go recycle the battery or give it back again in a garage!
Last update on 2019-02-22 / Affiliate links / Images from Amazon Product Advertising API