
Undoubtedly nothing more demoralizing than a battery trouble. You leave out the lights on or there is a internal trouble and your TATA model Aria battery is dead! Not very practical in the event that you have stuff to complete.
Hopefully, the battery substitution operation is simplistic and the sole genuine discomfort is acquiring the optimal battery for your TATA model Aria.
The battery replacing is very simple and it requires only three steps!
If you desire to obtain the best battery for your TATA model Aria here a few proposals that you can expect to obtain on Amazon, a respected website


After choosing your future battery, keep an eye on these next points and you might be fine back again with your car
Just before replacement of your battery, let us remind you to park your vehicle in a stable place, emergency break on and be assured the fact that the engine is off!
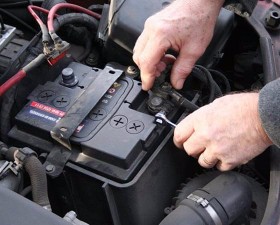
1 – Disassemble the battery wires
The battery is found below the hood of your car. Stretch the hood release lever placed on the vehicle driver side. Quickly as you gain access to to the battery, you are going to see that there is two wires attached to it. Be vigilant, there is one positive cable and one negative cable. You have to keep in mind where these were placed or you will definitely be in stress when positioning back the cool new battery on your car.
2 – Take away the old battery of your TATA model Aria
Extracting the old dead battery from your car should certainly not be a difficulty. Once all cables are detached, just remove the previous battery and that’s it. Be careful because batteries can be extremely weighty. If you are certainly not convinced about your capacity, support could be nice.
In the case you experience some dirt or any kind of different pollutants, take a cloth and remove the battery’s plastic tray to avoid any kind of complications for the following point
3 – Put in the new battery on your TATA model Aria
Assuming you performed tasks well, you will remember the previous battery placement. Add the all new battery in the matching placement and connect the positive cable on the appropriate space and then same way for the negative cable.
Now your car should be working like the first day!
Soon after your battery is exchanged, don’t put the out of date battery in the trash can or in the environment! This car product is extremely dangerous and it can be damageable for the environnement. Go recycling your battery or simply bring it back in a garage!
Last update on 2019-02-22 / Affiliate links / Images from Amazon Product Advertising API